How to Upload and Choose Images in Lightoom
In our previous Mastering Lightroom series manufactures we covered what Lightroom is and how it works. We also took a quick bout around Lightroom's working surroundings. Later highlighting the bones function and capability of each Module, it is at present time to talk about them individually more in-depth, starting with Library Module. Earlier nosotros can actually start using all Library tools, however, we demand images to work with. That is why our first step is to learn how to import photographs in Lightroom. I volition be using the latest (at the time of writing) version, Lightroom 5, to guide you through the process of Importing images. Virtually everything merely Smart Previews is equally applicable to earlier releases.
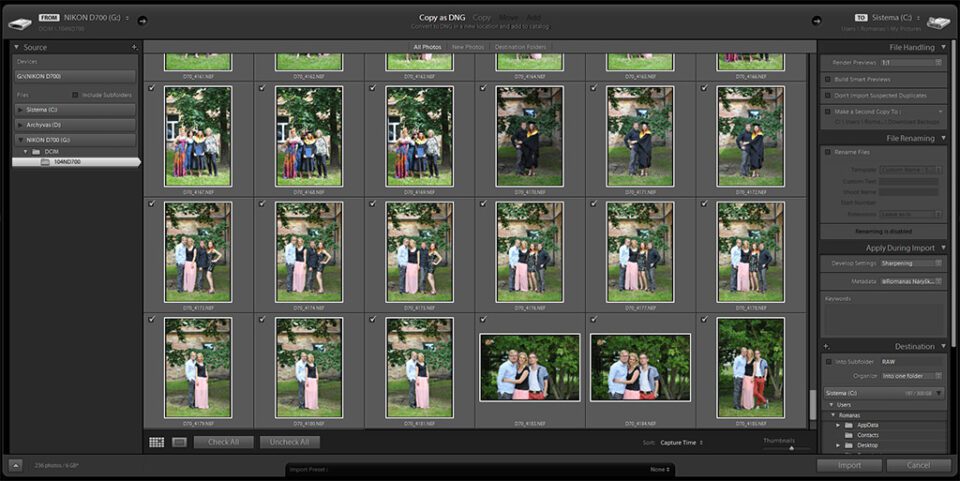
Table of Contents
Importing Photographs
Lightroom is a catalog-based photo director and post-processing tool. That means in order to outset working with photographs, you need to first Import them into your Catalog. Importing is a very unproblematic, straightforward process done using the Import window. To showtime the procedure of Importing photographs, launch Lightroom and and so click "Import…" at the lesser of the left-side panel in Library Module. Alternatively, you tin Import photographs past selecting "Import Photos and Video…" from File carte du jour (Ctrl+Shift+I for Windows users). This will open the Import window for you to choose source directory, image files, destination and other details.
A side note: by default, Lightroom should automatically launch and ready itself for firsthand Import as soon every bit you connect an external storage device to your computer, such every bit a photographic camera or retentiveness card. If it does not or should you lot desire to change this behavior, become to "Preferences…" in "Edit" bill of fare and check or uncheck the "Show import dialog when a memory bill of fare is detected" box in the General tab. I detect this a particularly useful option, yet nonetheless disabled it immediately after installing Lightroom on my figurer due to a simple irritation. Lightroom would launch its Import dialogue even if I connect a simple USB flash drive which I use for full general files and documents, not photographs I need in my Catalog.
ane) Import Window Structure
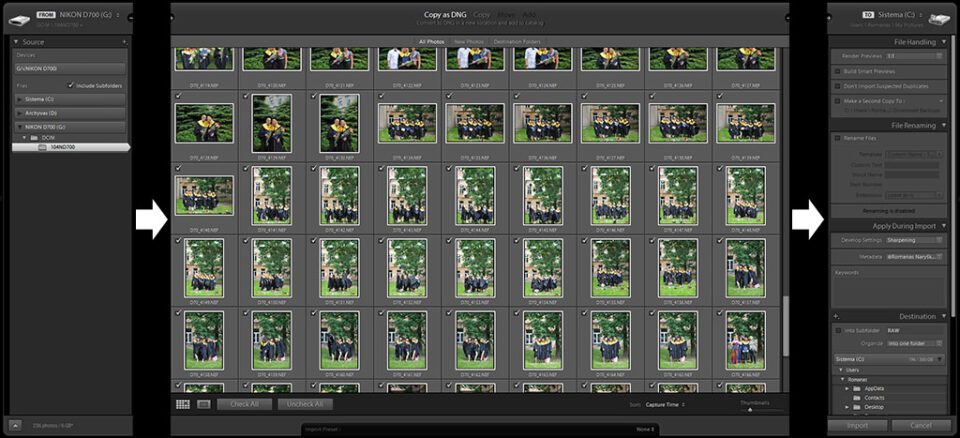
Lightroom'southward Import window consists of three principal sections, as shown in the screenshot below. These iii sections clearly mark sequence of actions yous need to take to successfully Import photographs into your Catalog.
First of all, you will demand to select the source to Import epitome files from. Once you practice that, choose which images to Import from the heart section of the window. Lightroom will generate thumbnail previews for both JPEG and RAW image files. Finally, specify boosted information in the right-virtually section of the window. The tabs that will be available hither depend on what settings yous choose in the two previous steps. In all cases, y'all will have File Handling and Apply During Import tabs bachelor.
A side note: at times, Lightroom will allow y'all to most skip two previous Import window sections. For example, if you lot've just connected your photographic camera for epitome transfer and want to Import them straight through Lightroom, it volition automatically choose source destination (camera or memory card). Lightroom will then select all or new images (those that are not nevertheless Imported into working Itemize) for Import process. Often, you volition demand to simply fine-tune those settings and add together data in the last section. This makes the process of Importing pleasantly swift well-nigh of the time.
If you tend to Import photographs straight from memory card later on a shoot and rarely, if e'er, demand to select specific images manually, y'all can have Lightroom evidence much simpler Import dialogue. To do that, either hit the arrow button at the bottom-left of the screen or Tab central on your keyboard.
2) Choose Source to Import From
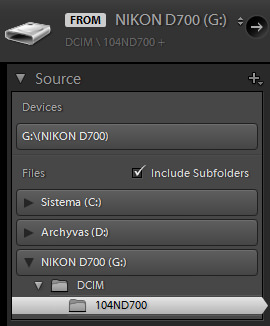
This is what the start department of the Import window is for. If you take a retentivity card, USB drive or camera connected to your reckoner, Lightroom will automatically choose it as source directory for y'all. All external devices will be shown in a separate list at the elevation of the Source tab. As well, there will be an option to have Lightroom eject external storage device equally soon every bit Import procedure is over if one of the devices from the listing is selected as source. To do that, marker the relative "Squirt after import" bank check box.
If at that place are no external devices to Import from, navigate to the source directory manually. In this example, you will have a "Include Subfolders" check box ready. Enabling this setting will display all images in selected folder and those in folders inside it if any are nowadays.
iii) Choose Image Files to Import
The second step is as simple as the first one – now that you have shown Lightroom where your images reside, choose which ones you lot want in your Catalog. Lightroom will automatically greyness-out photographs that are already imported provided they are named identically. In such a case you don't need to worry about duplicates sneaking in. At the lesser of the central section you volition find the usual and straightforward controls, such as "Bank check All" or "Uncheck All". Hold down Alt fundamental to toggle "Check Videos" and "Uncheck Videos" options instead. In that location are also sorting options. Conform thumbnail size if you'd like bigger previews as y'all select specific images to Import. Do note Lightroom volition not return these in high quality. You can preview images in Loupe view (magnified view when only one image is shown) past double-clicking on them or hitting "Due east" cardinal. Striking "Thousand" to get back to Grid view or double-click over again.
4) Choose to Copy as DNG, Copy, Move or Add Paradigm Files
Located at the summit of central department, these options allow you to specify the method of import. Some adjustments in the last section depend on which setting y'all choose here.
- Copy equally DNG – image files volition exist copied from source directory to a specified location in Adobe'southward universal DNG format. Read our "DNG vs RAW" article to learn more almost DNG file format.
- Copy – image files volition exist copied from source directory to a specified location in original file format.
- Motion – image files will be moved from source directory to a specified location in original file format. This option is unavailable when Importing from a memory card, for example.
- Add – files will not be copied or moved to a new location. Instead, Lightroom will just add them to your working Catalog. This option is as well unavailable when Importing from a retention carte du jour or USB flash drive.
5) Choose Destination to Copy Files to, File Handling Options and Metadata Settings
This concluding department of the Import dialogue is the final step you need to take to Import files and also one you'll spend most time in. Let'due south break information technology down and briefly discuss each tab.
5.1) File Handling
- Render Previews – specify quality in which Lightroom should render previews for images yous are Importing. Choosing Minimal will use smallest previews that are already embedded into the files by your photographic camera. This is the quickest choice and volition take upward the least disk space. Lightroom volition return Standard previews when needed (when in Loupe view mode). This volition tedious downwards operational speed somewhat at starting time when working with images.
Choose Embedded&Sidecar selection to have Lightroom use highest quality embedded previews. A slightly slower process, it will likewise take a little bit more than space on your hard drive. Once more, Lightroom will render Standard previews when needed. This process will take an impact on operational speed at first.
Render Standard previews to avoid slow-downs in Loupe view Fit zoom level. Instead of using embedded previews, Lightroom will render Standard size on its own. This process takes longer than the two previous options, but makes working with images swifter. You can fine-melody Standard preview quality by selecting "Catalog Settings…" from the "Edit" menu (striking Ctrl+Alt+,). Standard preview settings are found in the "File Handling" tab.
1:one previews are total-size images. They are used when zoomed in to larger magnifications, such as 100%. Rendering i:1 previews takes the most time after the Import process is over and most deejay infinite. However, it makes working with images even faster when washed (you won't have to wait for Lightroom to render 1:1 previews when zooming in individual images as you would with whatsoever of the other options selected). I would recommend you apply this setting if you programme to postal service-process your images.
- Build Smart Previews – this check box is only available starting Lightroom version 5. Smart Previews are especially useful if you lot prefer to go on your weighty RAW files on an external drive. If you check the "Build Smart Previews" check box as you import your images, Lightroom will allow you to mail service-process the photographs in any way you like fifty-fifty if they are not directly accessible at the fourth dimension. More than that, you will even be able to export them up to about 2540px (long border), which is great for web sharing. Understandably, Smart Previews take up some disk infinite. They are stored along with your Itemize files.
- Don't Import Suspected Duplicates – if you select this option, Lightroom volition attempt to avert duplicates on Import should they be nowadays amid selected files.
- Make a 2nd Re-create To – very useful if y'all tend back up your epitome files to another location. Lightroom will re-create all paradigm files you selected for Import to a specified location. This option is only available if you chose Copy as DNG, Copy or Move Import methods and doesn't work with Add.
5.ii) File Renaming
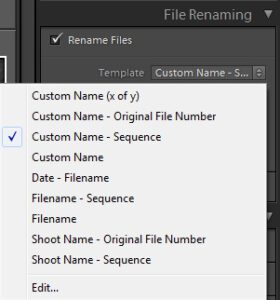
A gear up of important options only available if you chose to Copy/Copy equally DNG or Move files on Import, it allows yous to specify how you want to rename the images. Several naming templates are available and you can choose to create your own. File naming is best used in accordance to your epitome organizing model. For instance, y'all can have your image name consist of engagement, outcome title and sequence number.
Creating your own template is very simple. Lightroom offers a huge corporeality of options for you to include. To create your own template, click on the drop-downwards listing of available templates and choose "Edit…". Filename Template Editor volition pop-upward – an extremely flexible tool yous volition utilize to create your ain naming template. As soon as you lot're done customizing your preset, use the Preset drib-downwards bill of fare at the tiptop of the Filename Template Editor dialogue and select "Save Current Settings equally New Preset" to save and employ the template.
To larn more virtually filename presets, read our "Using Filename Template Editor in Lightroom" article.
5.3) Apply During Import
Yet some other set of important options you will definitely want to fill in.
- Develop Settings – allows you lot to apply a Develop Preset on images as shortly as they go available in your Library. It'south great at giving you an approximate look of your final result rather than the flat RAW image rendering. Because you can only apply a single Develop Preset on Import, this setting works best with B&W conversion, color adjustment and tone adjustment Presets. Naturally, you can set information technology to a Sharpening or Noise Reduction Preset if yous have those. The latter will give you a pretty good idea on which images came out too grainy for your taste.
Read more than about Develop Presets in our "How to Manage Presets" article.
- Metadata – specify metadata preset to apply. You can easily edit or create new presets past choosing respective options from the drop-downward menu. Managing metadata presets will be covered in a carve up article.
- Keywords – specify keywords that suit all the images you are nigh to Import, such as event name. They are very useful when searching for specific photographs in Lightroom or sorting them. Practise not apply keywords that are only appropriate for some of the photographs. For example, if yous have both portraits and landscapes selected, information technology is better to add "Portrait" and "Landscape" keywords to these images separately in the Library Module after the Import. All of the keywords tin be edited at any time after the Import.
five.4) Destination
Setting destination is only available if yous chose to Re-create/Copy as DNG or Move files on Import. You can specify a subfolder proper noun and have Lightroom Import images into separate folders for you rather than a unmarried ane (based on date, for instance).
6) Create an Import Preset
There you go! You can at present go ahead and click "Import" – all selected images will appear in your Library Module and take the keywords and metadata entries attached to them. Still, in instance you find yourself setting up Import dialogue the same way on a regular basis, yous tin can also salve these settings equally an Import Preset. To do that, employ the Import Preset tool located at the very bottom of the Import window.

Either way y'all are at present fix to start managing and post-processing your photographs. If yous accept whatever questions, you are welcome to ask in the comments section below.
Source: https://photographylife.com/how-to-import-photographs-in-lightroom
0 Response to "How to Upload and Choose Images in Lightoom"
Post a Comment